
Welcome to our Support Center
-
SOTA
-
Accelerator Toolkit
-
Deep Learning Toolkit
-
-
- Resume
- Add
- AlphaDropout
- AdditiveAttention
- Attention
- Average
- AvgPool1D
- AvgPool2D
- AvgPool3D
- BatchNormalization
- Bidirectional
- Concatenate
- Conv1D
- Conv1DTranspose
- Conv2D
- Conv2DTranspose
- Conv3D
- Conv3DTranspose
- ConvLSTM1D
- ConvLSTM2D
- ConvLSTM3D
- Dense
- Cropping1D
- Cropping2D
- Cropping3D
- DepthwiseConv2D
- Dropout
- Embedding
- Flatten
- ELU
- Exponential
- GaussianDropout
- GaussianNoise
- GlobalAvgPool1D
- GlobalAvgPool2D
- GlobalAvgPool3D
- GlobalMaxPool1D
- GlobalMaxPool2D
- GlobalMaxPool3D
- GRU
- GELU
- Input
- LayerNormalization
- LSTM
- MaxPool1D
- MaxPool2D
- MaxPool3D
- MultiHeadAttention
- HardSigmoid
- LeakyReLU
- Linear
- Multiply
- Permute3D
- Reshape
- RNN
- PReLU
- ReLU
- SELU
- Output Predict
- Output Train
- SeparableConv1D
- SeparableConv2D
- SimpleRNN
- SpatialDropout
- Sigmoid
- SoftMax
- SoftPlus
- SoftSign
- Split
- UpSampling1D
- UpSampling2D
- UpSampling3D
- ZeroPadding1D
- ZeroPadding2D
- ZeroPadding3D
- Swish
- TanH
- ThresholdedReLU
- Substract
- Show All Articles (63) Collapse Articles
-
-
-
-
- Exp
- Identity
- Abs
- Acos
- Acosh
- ArgMax
- ArgMin
- Asin
- Asinh
- Atan
- Atanh
- AveragePool
- Bernouilli
- BitwiseNot
- BlackmanWindow
- Cast
- Ceil
- Celu
- ConcatFromSequence
- Cos
- Cosh
- DepthToSpace
- Det
- DynamicTimeWarping
- Erf
- EyeLike
- Flatten
- Floor
- GlobalAveragePool
- GlobalLpPool
- GlobalMaxPool
- HammingWindow
- HannWindow
- HardSwish
- HardMax
- lrfft
- lsNaN
- Log
- LogSoftmax
- LpNormalization
- LpPool
- LRN
- MeanVarianceNormalization
- MicrosoftGelu
- Mish
- Multinomial
- MurmurHash3
- Neg
- NhwcMaxPool
- NonZero
- Not
- OptionalGetElement
- OptionalHasElement
- QuickGelu
- RandomNormalLike
- RandomUniformLike
- RawConstantOfShape
- Reciprocal
- ReduceSumInteger
- RegexFullMatch
- Rfft
- Round
- SampleOp
- Shape
- SequenceLength
- Shrink
- Sin
- Sign
- Sinh
- Size
- SpaceToDepth
- Sqrt
- StringNormalizer
- Tan
- TfldfVectorizer
- Tokenizer
- Transpose
- UnfoldTensor
- lslnf
- ImageDecoder
- Inverse
- Show All Articles (65) Collapse Articles
-
-
-
- Add
- AffineGrid
- And
- BiasAdd
- BiasGelu
- BiasSoftmax
- BiasSplitGelu
- BitShift
- BitwiseAnd
- BitwiseOr
- BitwiseXor
- CastLike
- CDist
- CenterCropPad
- Clip
- Col2lm
- ComplexMul
- ComplexMulConj
- Compress
- ConvInteger
- Conv
- ConvTranspose
- ConvTransposeWithDynamicPads
- CropAndResize
- CumSum
- DeformConv
- DequantizeBFP
- DequantizeLinear
- DequantizeWithOrder
- DFT
- Div
- DynamicQuantizeMatMul
- Equal
- Expand
- ExpandDims
- FastGelu
- FusedConv
- FusedGemm
- FusedMatMul
- FusedMatMulActivation
- GatedRelativePositionBias
- Gather
- GatherElements
- GatherND
- Gemm
- GemmFastGelu
- GemmFloat8
- Greater
- GreaterOrEqual
- GreedySearch
- GridSample
- GroupNorm
- InstanceNormalization
- Less
- LessOrEqual
- LongformerAttention
- MatMul
- MatMulBnb4
- MatMulFpQ4
- MatMulInteger
- MatMulInteger16
- MatMulIntergerToFloat
- MatMulNBits
- MaxPoolWithMask
- MaxRoiPool
- MaxUnPool
- MelWeightMatrix
- MicrosoftDequantizeLinear
- MicrosoftGatherND
- MicrosoftGridSample
- MicrosoftPad
- MicrosoftQLinearConv
- MicrosoftQuantizeLinear
- MicrosoftRange
- MicrosoftTrilu
- Mod
- MoE
- Mul
- MulInteger
- NegativeLogLikelihoodLoss
- NGramRepeatBlock
- NhwcConv
- NhwcFusedConv
- NonMaxSuppression
- OneHot
- Or
- PackedAttention
- PackedMultiHeadAttention
- Pad
- Pow
- QGemm
- QLinearAdd
- QLinearAveragePool
- QLinearConcat
- QLinearConv
- QLinearGlobalAveragePool
- QLinearLeakyRelu
- QLinearMatMul
- QLinearMul
- QLinearReduceMean
- QLinearSigmoid
- QLinearSoftmax
- QLinearWhere
- QMoE
- QOrderedAttention
- QOrderedGelu
- QOrderedLayerNormalization
- QOrderedLongformerAttention
- QOrderedMatMul
- QuantizeLinear
- QuantizeWithOrder
- Range
- ReduceL1
- ReduceL2
- ReduceLogSum
- ReduceLogSumExp
- ReduceMax
- ReduceMean
- ReduceMin
- ReduceProd
- ReduceSum
- ReduceSumSquare
- RelativePositionBias
- Reshape
- Resize
- RestorePadding
- ReverseSequence
- RoiAlign
- RotaryEmbedding
- ScatterElements
- ScatterND
- SequenceAt
- SequenceErase
- SequenceInsert
- Sinh
- Slice
- SparseToDenseMatMul
- SplitToSequence
- Squeeze
- STFT
- StringConcat
- Sub
- Tile
- TorchEmbedding
- TransposeMatMul
- Trilu
- Unsqueeze
- Where
- WordConvEmbedding
- Xor
- Show All Articles (134) Collapse Articles
-
- Attention
- AttnLSTM
- BatchNormalization
- BiasDropout
- BifurcationDetector
- BitmaskBiasDropout
- BitmaskDropout
- DecoderAttention
- DecoderMaskedMultiHeadAttention
- DecoderMaskedSelfAttention
- Dropout
- DynamicQuantizeLinear
- DynamicQuantizeLSTM
- EmbedLayerNormalization
- GemmaRotaryEmbedding
- GroupQueryAttention
- GRU
- LayerNormalization
- LSTM
- MicrosoftMultiHeadAttention
- QAttention
- RemovePadding
- RNN
- Sampling
- SkipGroupNorm
- SkipLayerNormalization
- SkipSimplifiedLayerNormalization
- SoftmaxCrossEntropyLoss
- SparseAttention
- TopK
- WhisperBeamSearch
- Show All Articles (15) Collapse Articles
-
-
-
-
-
-
-
-
-
-
- AdditiveAttention
- Attention
- BatchNormalization
- Bidirectional
- Conv1D
- Conv2D
- Conv1DTranspose
- Conv2DTranspose
- Conv3DTranspose
- Conv3D
- ConvLSTM1D
- ConvLSTM2D
- ConvLSTM3D
- Dense
- DepthwiseConv2D
- Embedding
- LayerNormalization
- GRU
- LSTM
- PReLU 2D
- PReLU 3D
- PReLU 4D
- PReLU 5D
- MutiHeadAttention
- SeparableConv1D
- SeparableConv2D
- MultiHeadAttention
- RNN (GRU)
- RNN (LSTM)
- RNN (SimpleRNN)
- SimpleRNN
- 1D
- 2D
- 3D
- 4D
- 5D
- 6D
- Scalar
- Show All Articles (22) Collapse Articles
-
- AdditiveAttention
- Attention
- BatchNormalization
- Conv1D
- Conv2D
- Conv1DTranspose
- Conv2DTranspose
- Bidirectional
- Conv3D
- ConvLSTM1D
- ConvLSTM2D
- ConvLSTM3D
- Conv3DTranspose
- DepthwiseConv2D
- Dense
- Embedding
- LayerNormalization
- GRU
- PReLU 2D
- PReLU 3D
- PReLU 4D
- MultiHeadAttention
- LSTM
- PReLU 5D
- SeparableConv1D
- SeparableConv2D
- SimpleRNN
- RNN (GRU)
- RNN (LSTM)
- RNN (SimpleRNN)
- 1D
- 2D
- 3D
- 4D
- 5D
- 6D
- Scalar
- Show All Articles (21) Collapse Articles
-
-
- AdditiveAttention
- Attention
- BatchNormalization
- Bidirectional
- Conv1D
- Conv2D
- Conv3D
- Conv1DTranspose
- Conv2DTranspose
- Conv3DTranspose
- ConvLSTM1D
- ConvLSTM2D
- ConvLSTM3D
- Dense
- DepthwiseConv2D
- Embedding
- GRU
- LayerNormalization
- LSTM
- MultiHeadAttention
- PReLU 2D
- PReLU 3D
- PReLU 4D
- PReLU 5D
- Resume
- SeparableConv1D
- SeparableConv2D
- SimpleRNN
- Show All Articles (12) Collapse Articles
-
-
- Dense
- Embedding
- AdditiveAttention
- Attention
- MultiHeadAttention
- Conv1D
- Conv2D
- Conv3D
- ConvLSTM1D
- ConvLSTM2D
- ConvLSTM3D
- Conv1DTranspose
- Conv2DTranspose
- Conv3DTranspose
- DepthwiseConv2D
- SeparableConv1D
- SeparableConv2D
- BatchNormalization
- LayerNormalization
- PReLU 2D
- PReLU 3D
- PReLU 4D
- PReLU 5D
- Bidirectional
- GRU
- LSTM
- RNN (GRU)
- RNN (LSTM)
- RNN (SimpleRNN)
- SimpleRNN
- PReLU 4D
- Show All Articles (15) Collapse Articles
-
- Dense
- Embedding
- AdditiveAttention
- Attention
- MultiHeadAttention
- Conv1D
- Conv2D
- Conv3D
- ConvLSTM1D
- ConvLSTM2D
- ConvLSTM3D
- Conv1DTranspose
- Conv2DTranspose
- Conv3DTranspose
- DepthwiseConv2D
- SeparableConv1D
- SeparableConv2D
- BatchNormalization
- LayerNormalization
- PReLU 2D
- PReLU 3D
- PReLU 4D
- PReLU 5D
- Bidirectional
- GRU
- LSTM
- RNN (GRU)
- RNN (LSTM)
- RNN (SimpleRNN)
- SimpleRNN
- Show All Articles (14) Collapse Articles
-
-
- Accuracy
- BinaryAccuracy
- BinaryCrossentropy
- BinaryIoU
- CategoricalAccuracy
- CategoricalCrossentropy
- CategoricalHinge
- CosineSimilarity
- FalseNegatives
- FalsePositives
- Hinge
- Huber
- IoU
- KLDivergence
- LogCoshError
- Mean
- MeanAbsoluteError
- MeanAbsolutePercentageError
- MeanIoU
- MeanRelativeError
- MeanSquaredError
- MeanSquaredLogarithmicError
- MeanTensor
- OneHotIoU
- OneHotMeanIoU
- Poisson
- Precision
- PrecisionAtRecall
- Recall
- RecallAtPrecision
- RootMeanSquaredError
- SensitivityAtSpecificity
- SparseCategoricalAccuracy
- SparseCategoricalCrossentropy
- SparseTopKCategoricalAccuracy
- Specificity
- SpecificityAtSensitivity
- SquaredHinge
- Sum
- TopKCategoricalAccuracy
- TrueNegatives
- TruePositives
- Resume
- Show All Articles (27) Collapse Articles
-
-
- Dense
- Embedding
- AdditiveAttention
- Attention
- MultiHeadAttention
- Conv1D
- Conv2D
- Conv3D
- ConvLSTM1D
- ConvLSTM2D
- ConvLSTM3D
- Conv1DTranspose
- Conv2DTranspose
- Conv3DTranspose
- DepthwiseConv2D
- SeparableConv1D
- SeparableConv2D
- BatchNormalization
- LayerNormalization
- PReLU 2D
- PReLU 3D
- PReLU 4D
- PReLU 5D
- Bidirectional
- GRU
- LSTM
- RNN (GRU)
- RNN (LSTM)
- RNN (SimpleRNN)
- SimpleRNN
- Show All Articles (14) Collapse Articles
-
- Dense
- Embedding
- AdditiveAttention
- Attention
- MultiHeadAttention
- Conv1D
- Conv2D
- Conv3D
- ConvLSTM1D
- ConvLSTM2D
- ConvLSTM3D
- Conv1DTranspose
- Conv2DTranspose
- Conv3DTranspose
- DepthwiseConv2D
- SeparableConv1D
- SeparableConv2D
- LayerNormalization
- PReLU 2D
- PReLU 3D
- PReLU 4D
- PReLU 5D
- Bidirectional
- GRU
- LSTM
- RNN (GRU)
- RNN (LSTM)
- RNN (SimpleRNN)
- SimpleRNN
- BatchNormalization
- Show All Articles (14) Collapse Articles
-
-
-
Computer Vision Toolkit
-
CUDA Toolkit
-
- Resume
- Array size
- Index Array
- Replace Subset
- Insert Into Array
- Delete From Array
- Initialize Array
- Build Array
- Concatenate Array
- Array Subset
- Min & Max
- Reshape Array
- Short Array
- Reverse 1D array
- Shuffle array
- Search In Array
- Split 1D Array
- Split 2D Array
- Rotate 1D Array
- Increment Array Element
- Decrement Array Element
- Interpolate 1D Array
- Threshold 1D Array
- Interleave 1D Array
- Decimate 1D Array
- Transpose Array
- Remove Duplicate From 1D Array
- Show All Articles (11) Collapse Articles
-
-
- Resume
- Add
- Substract
- Multiply
- Divide
- Quotient & Remainder
- Increment
- Decrement
- Add Array Element
- Multiply Array Element
- Absolute
- Round To Nearest
- Round Toward -Infinity
- Round Toward +Infinity
- Scale By Power Of Two
- Square Root
- Square
- Negate
- Reciprocal
- Sign
- Show All Articles (4) Collapse Articles
Updated
Building Executables from Graiphic Toolkits
How to build an executable ?
-
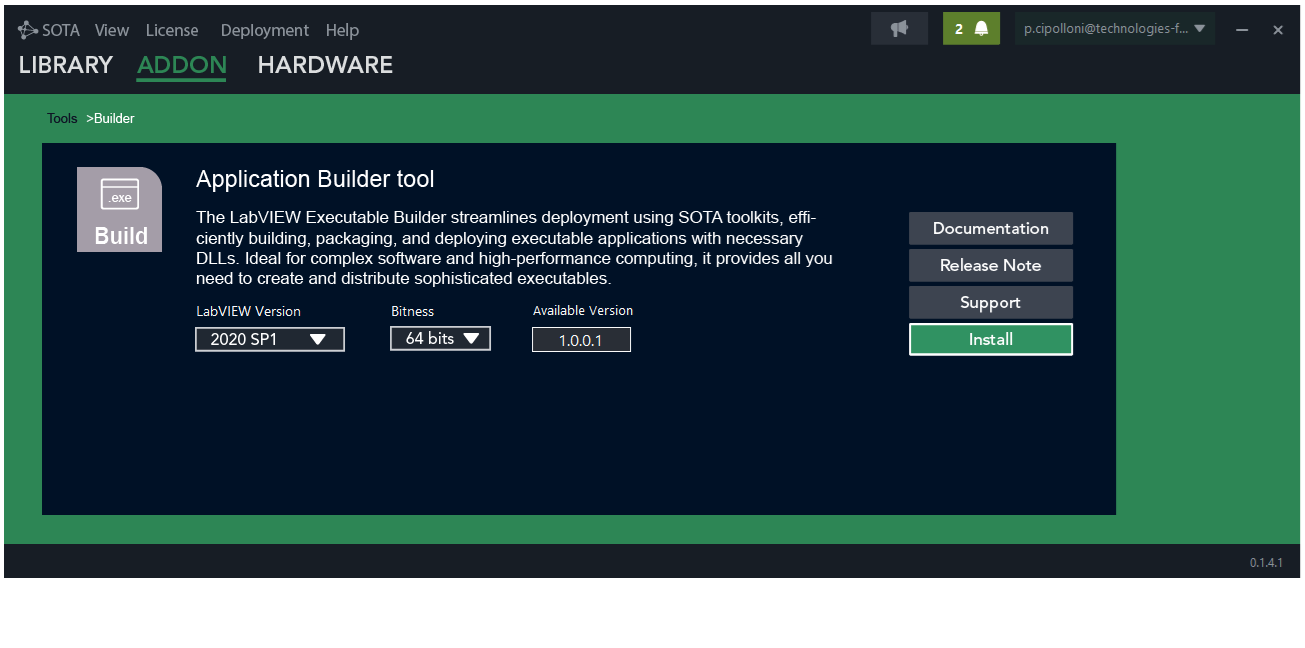
- Download and open SOTA. In the menu, select Addon, then click on Tools and choose the Builder tool. Then download the version of the Builder tool compatible with your LabVIEW installation.
-
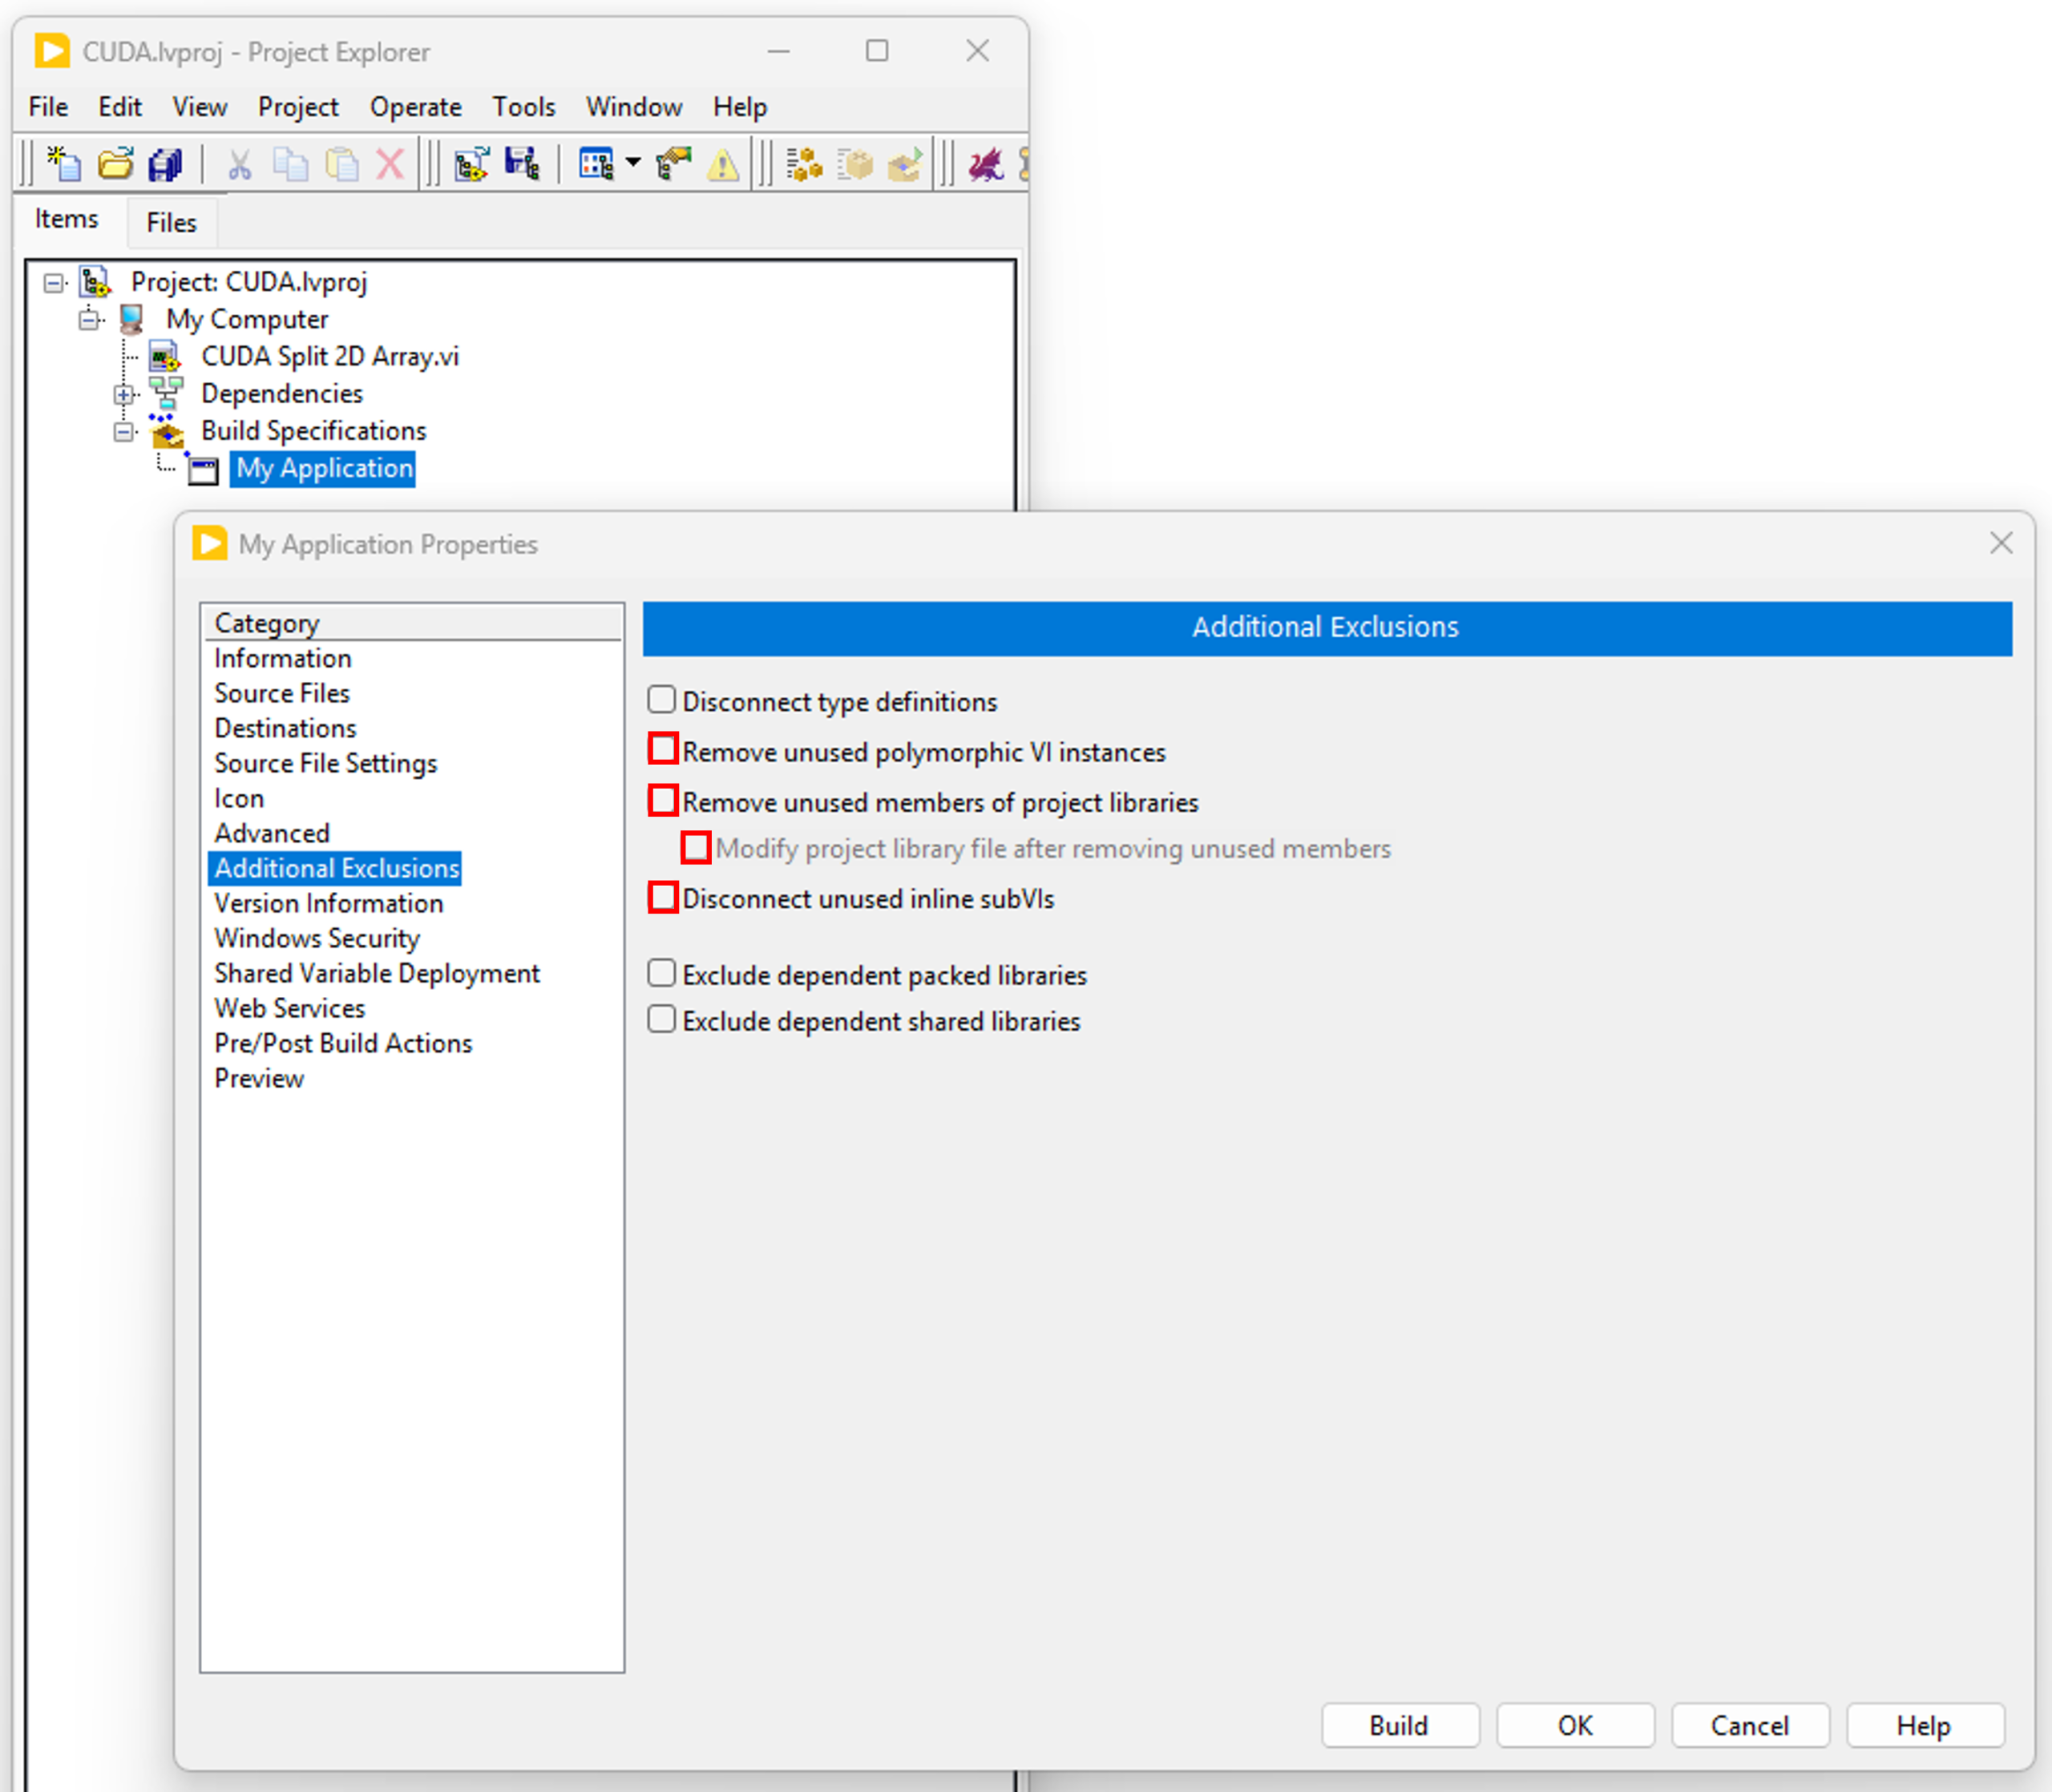
- Create your executable and in the “Additional Exclusions” tab, uncheck “Remove unused polymorphic VI instances“, “Remove unused members of project libraries” and “Disconnect unused inline subVIs“.
-
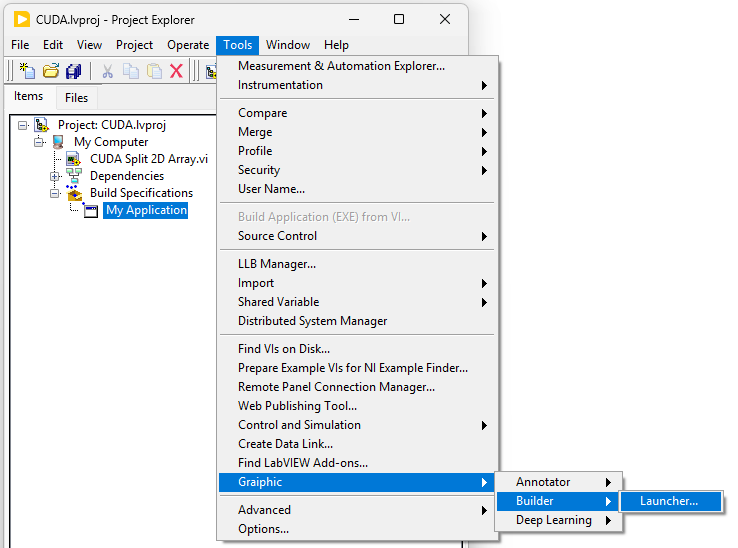
- Once your project has been created and configured, go to the LabVIEW menu, click on Tools, then on Graiphic and Builder, and launch the Launcher. A VI will open: it will allow you to manage the build of your executable by including the files required for its operation, depending on the Graiphic toolkits you are using.
-
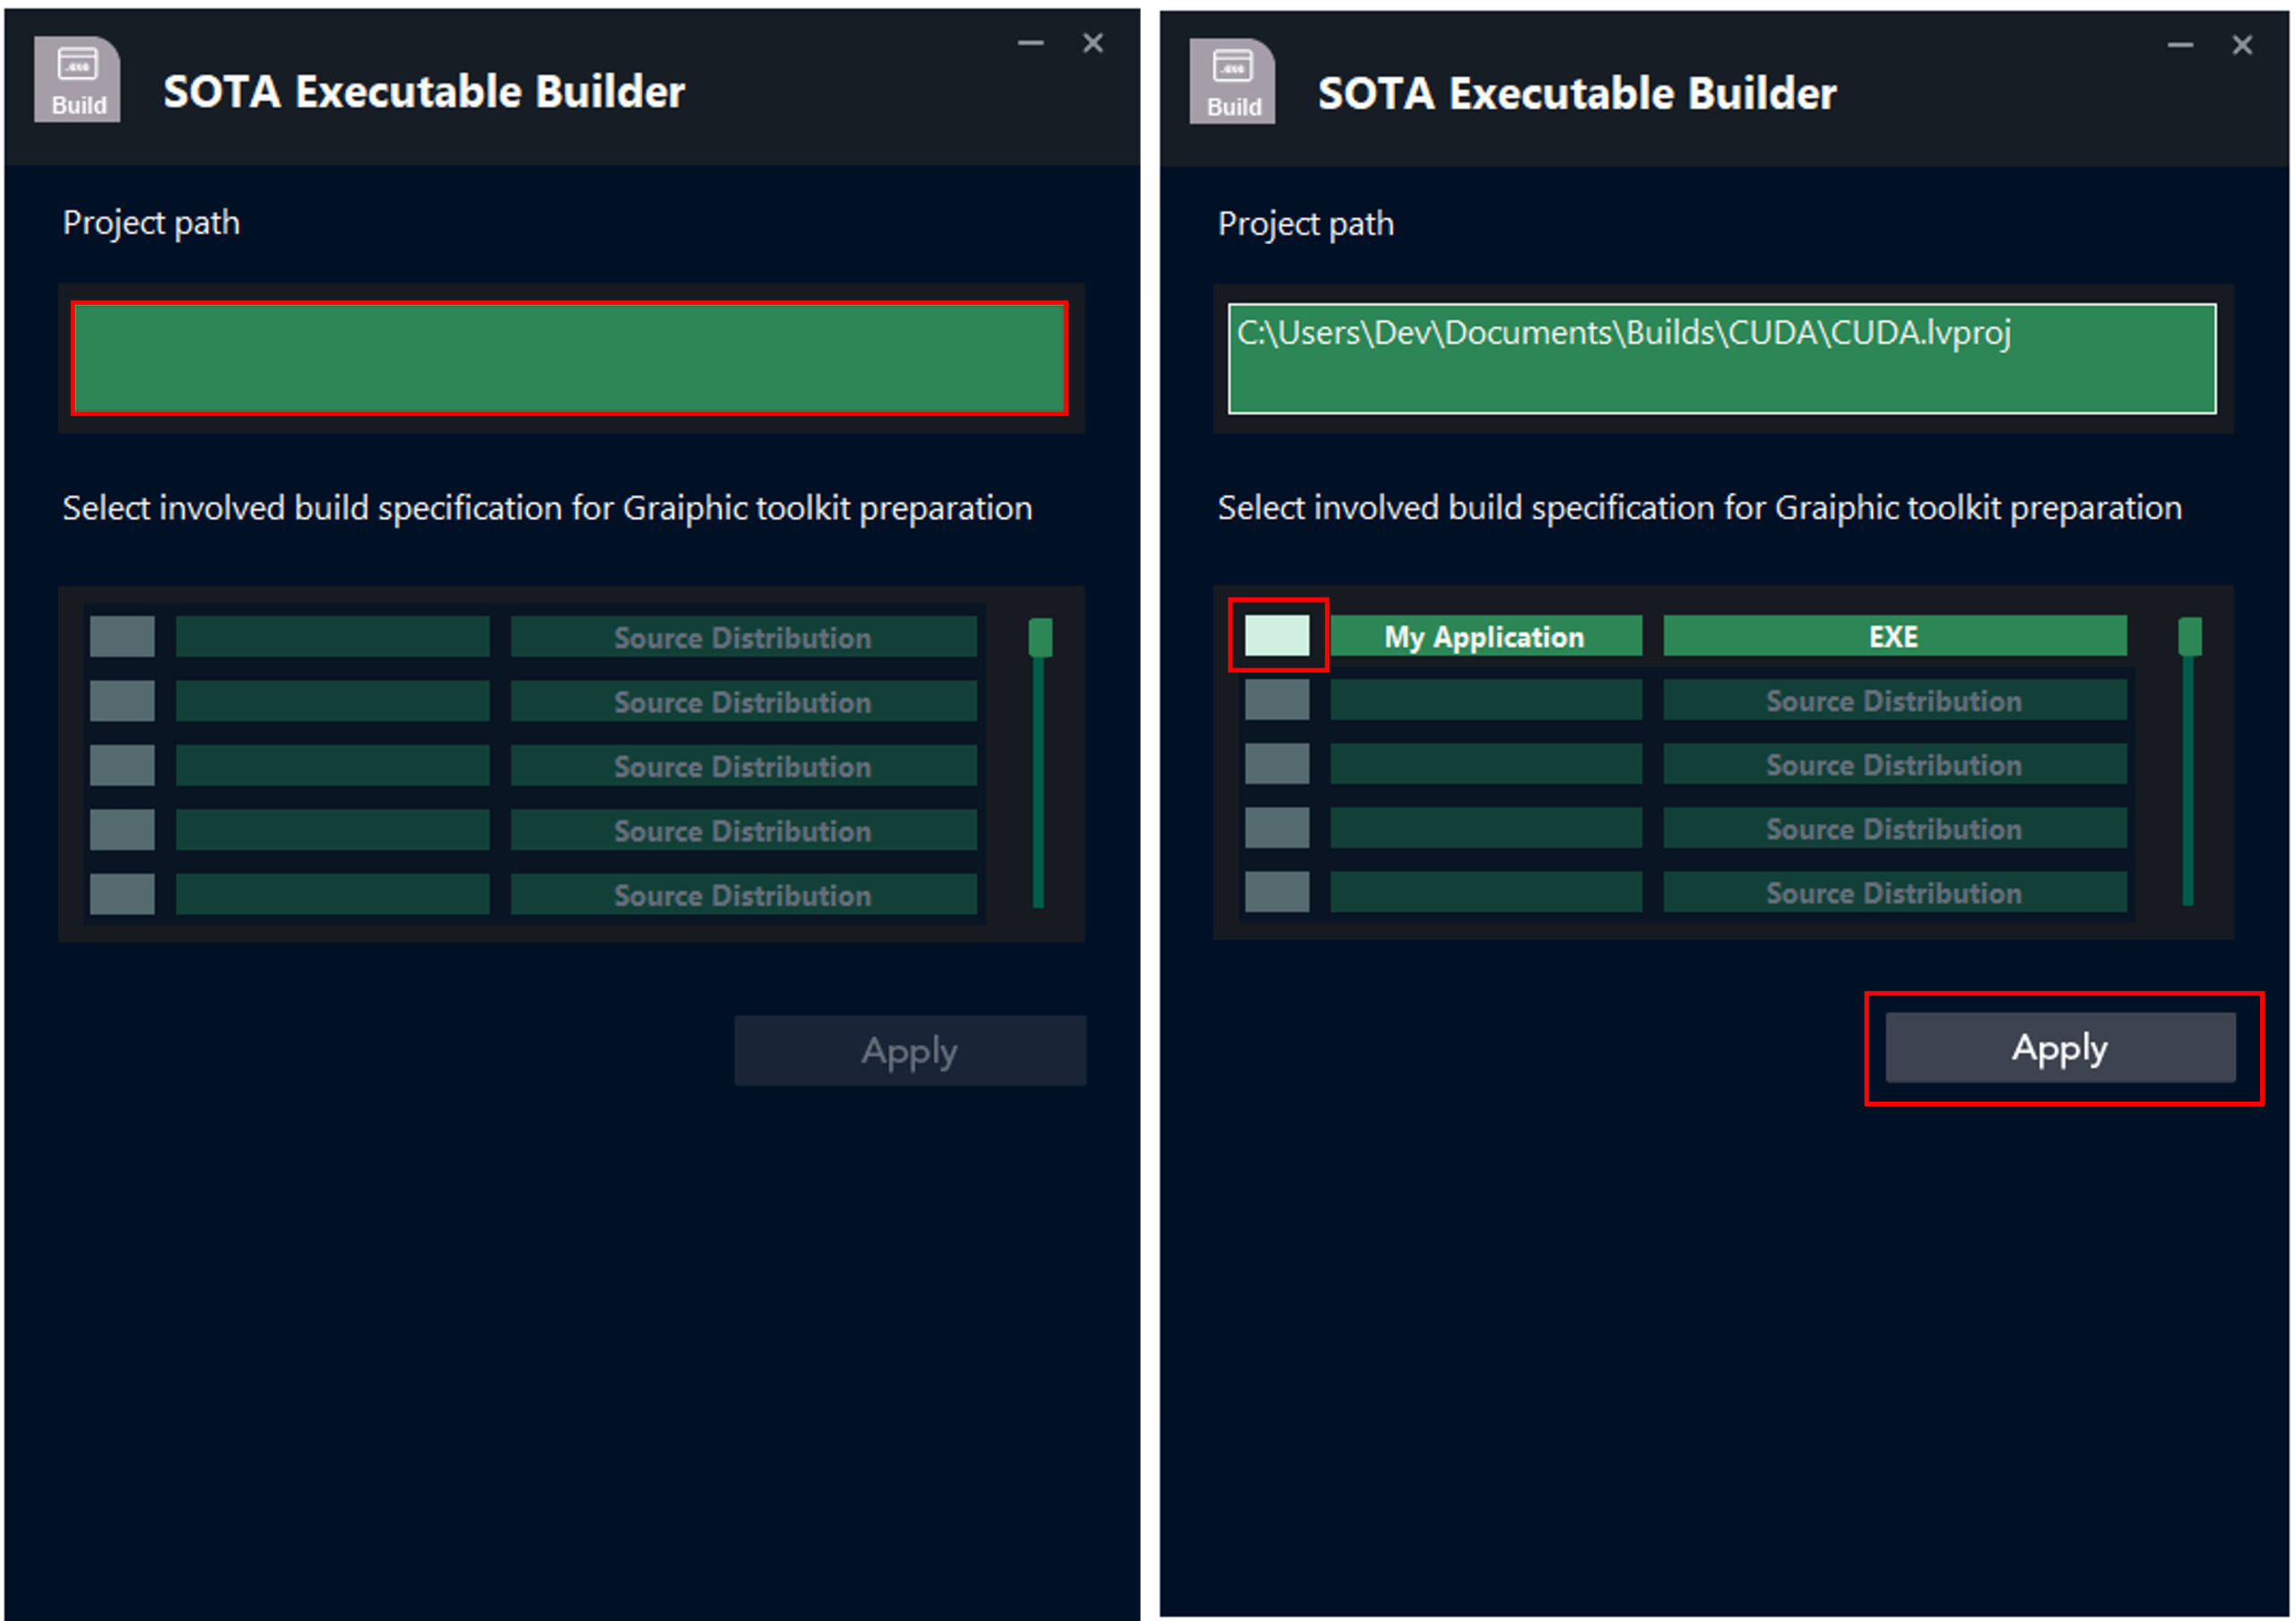
- Run the VI and click on the Project Path field to select your project path. Once the path is selected, the list of executables you have created will be displayed. All you need to do is select the executable you want to build, and then click Apply.
-
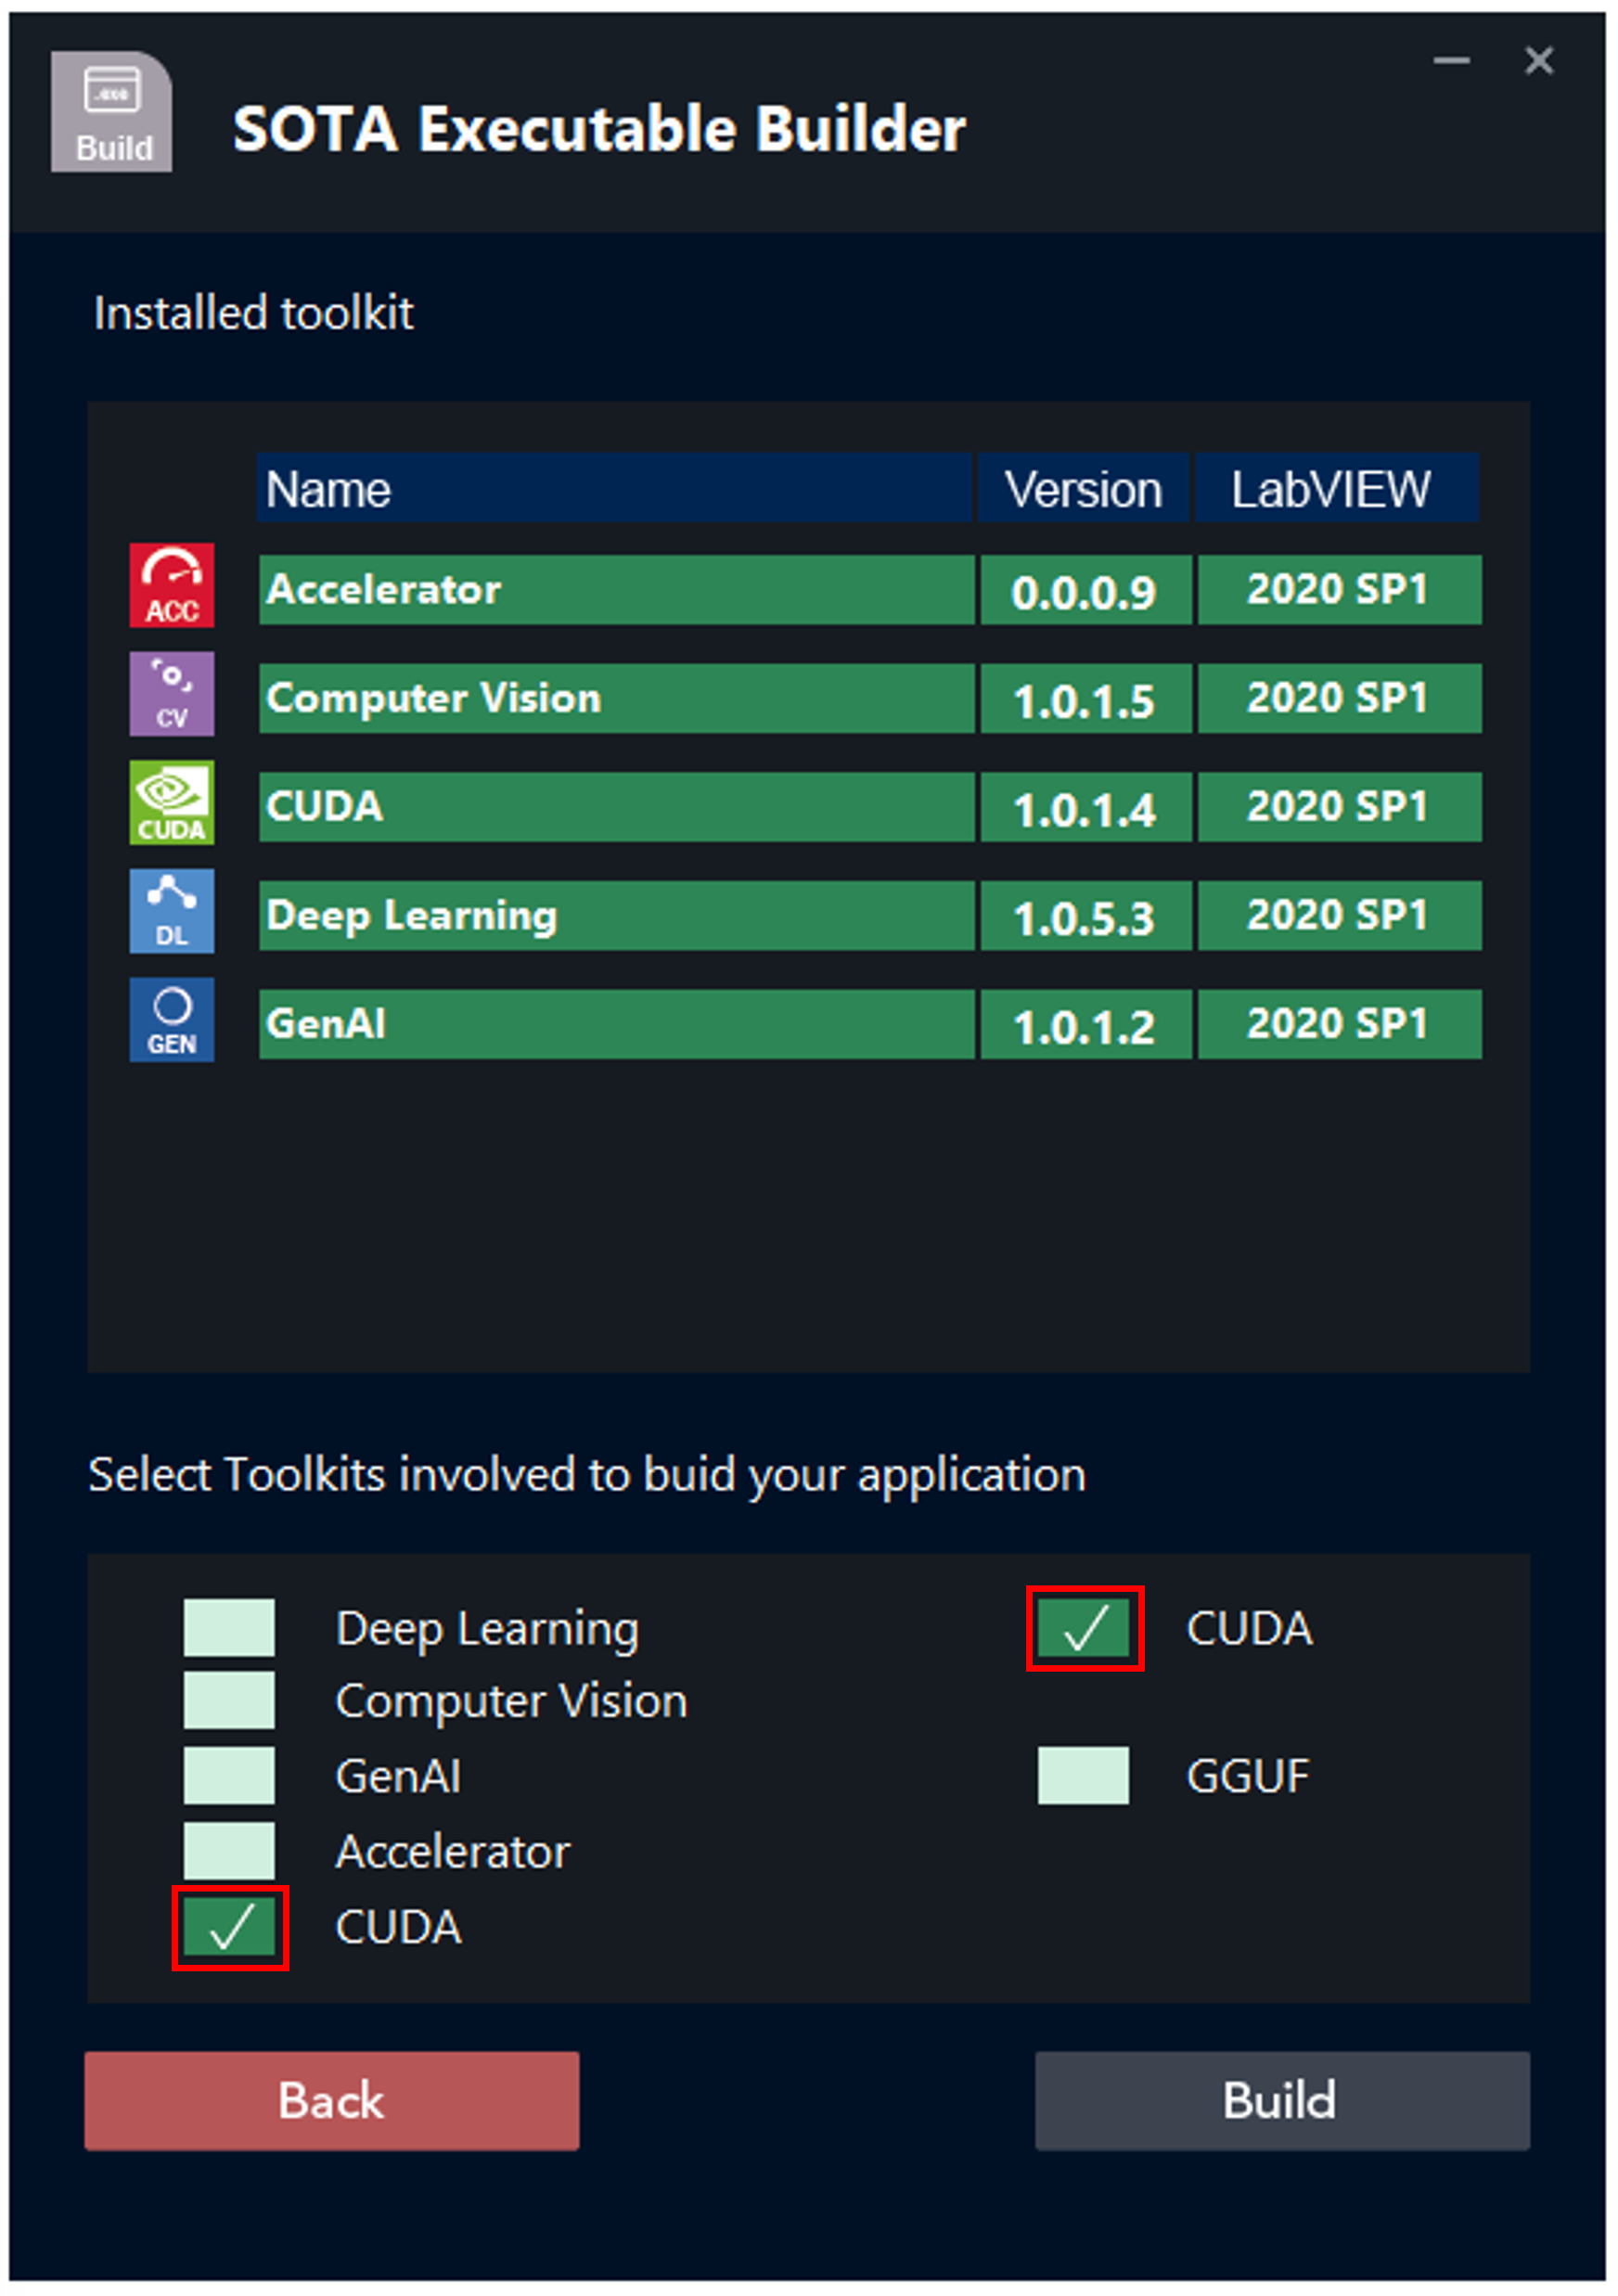
- On the second page, the toolkits installed on your computer are displayed. Simply select the toolkit(s) used in your project, and then click Build.
-
- The build of your LabVIEW executable will start. All you need to do is wait and then click Done.
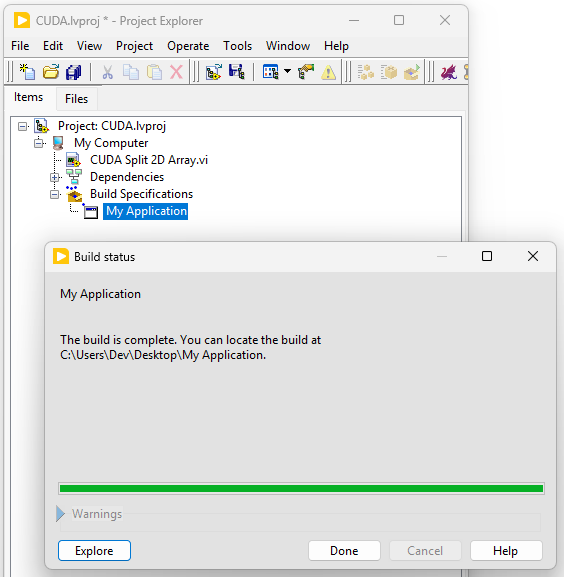
Table of Contents