In this post, we’ll show you how to train a yolov4 with darknet.
For this post we assume that you have already set up your “darknet environment”, if this is not the case, please refer to this detailed post.
I also assume that you have already downloaded the YOLOV4 Add-On from GIM, if not please refer to this post.
Create and clean YoloV4 folder
In this section, I’ll show you how to train YOLO models on custom data sets.
First of all, we’re going to create a directory in which we’re going to train our model.
Next, we’ll create a directory called “training”, which we’ll leave empty. It will fill up automatically during training and will contain the various weight files.
Then we’ll copy the darknet-master folder that we’ve built in all the previous steps.

This step is optional but I recommend it.
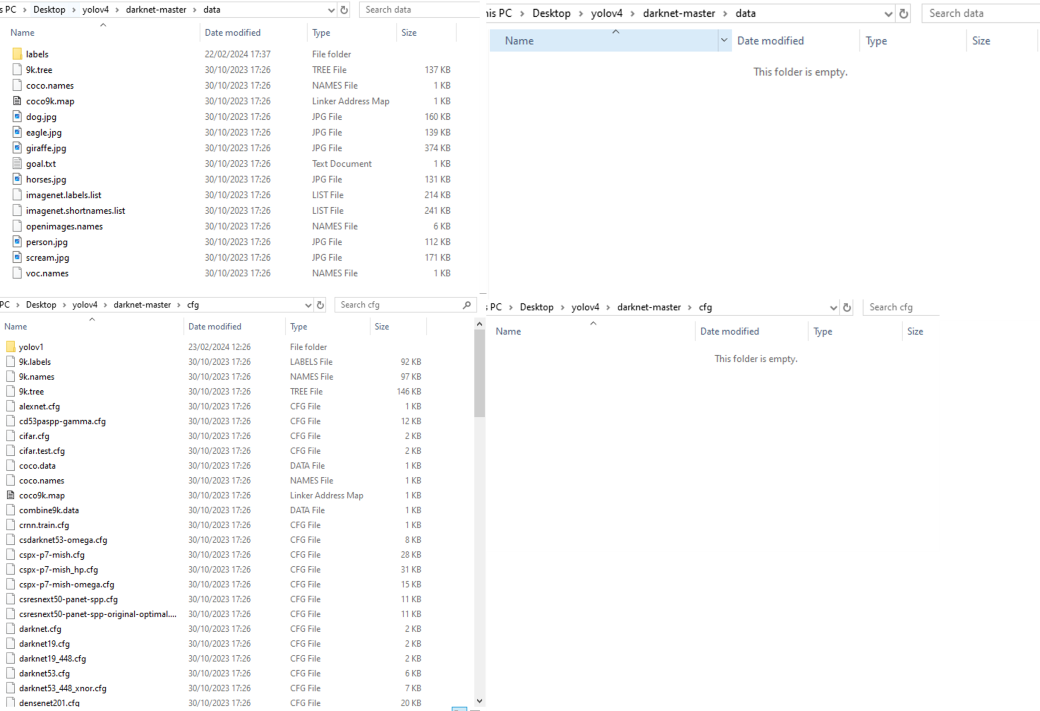
To improve readability in the directories, I suggest you delete the contents of the data and cfg directories.
Download YOLOV4 Pretrained Weight for fine tuning
Then, we’ll download the yolov4 pre-trained weights for fine tuning here.
Copy training files to YOLOV4 folder
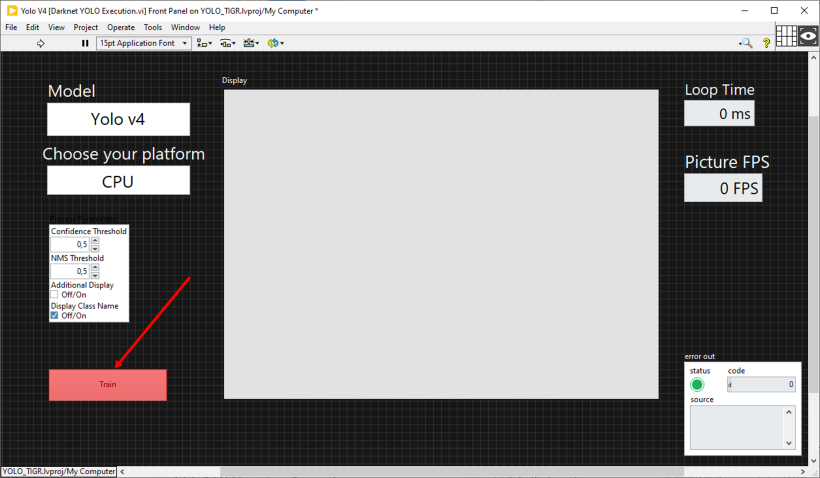
Next, we’re going to open this “Add On” folder using the “Train” button in the Yolo Darknet VI.
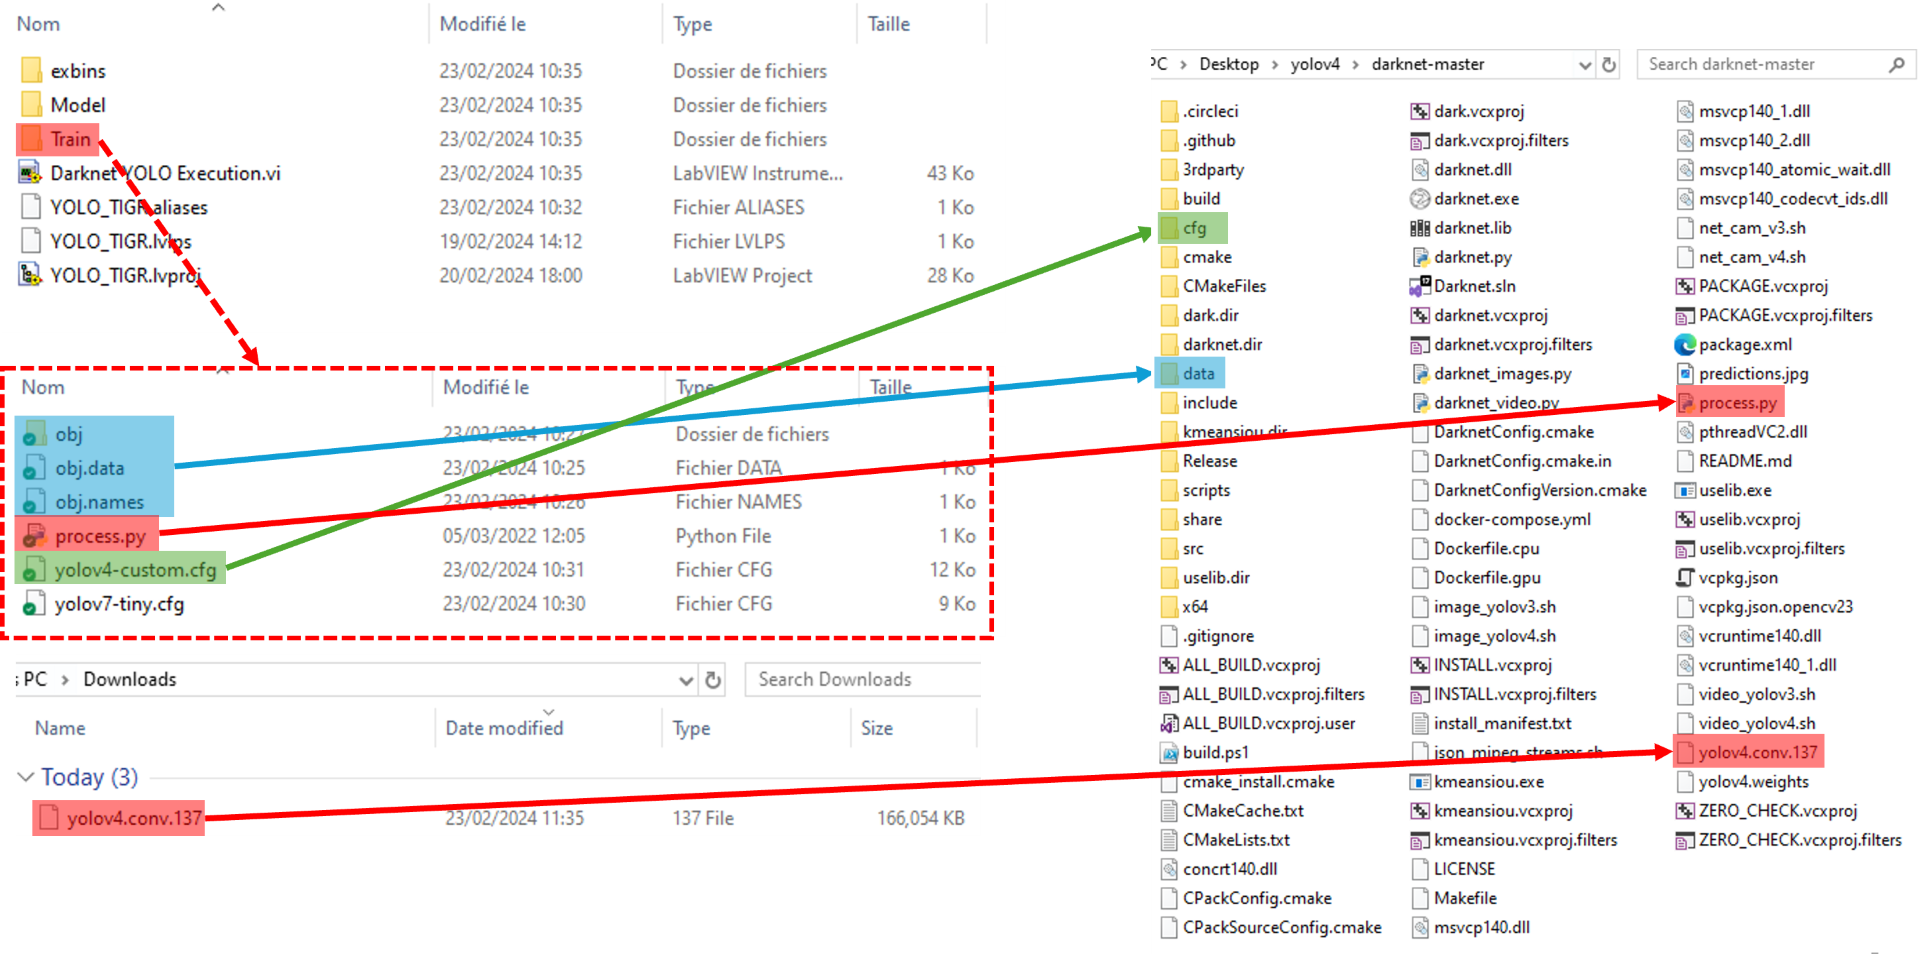
We will then copy several files from this directory into the yolov4 directory.
We will copy the files obj.data, obj.names and the obj folder into the darknet-master/data folder.
Then copy yolov4-custom.cfg into darknet-master/cfg.
Finally, copy the weight file yolov4.conv.137 that you downloaded and process.py into darknet-master.
In theory, from here you could run training on the dataset we’ve provided, but the aim is for you to be able to modify the training dataset and the files linked to it.
In the data/obj directory, you have your complete dataset divided into two types of file, .jpg images and .txt files corresponding to the labels.
This directory must be replaced by your custom dataset in the same format, an image and its associated txt.
The obj.data and obj.names files contain information for training.
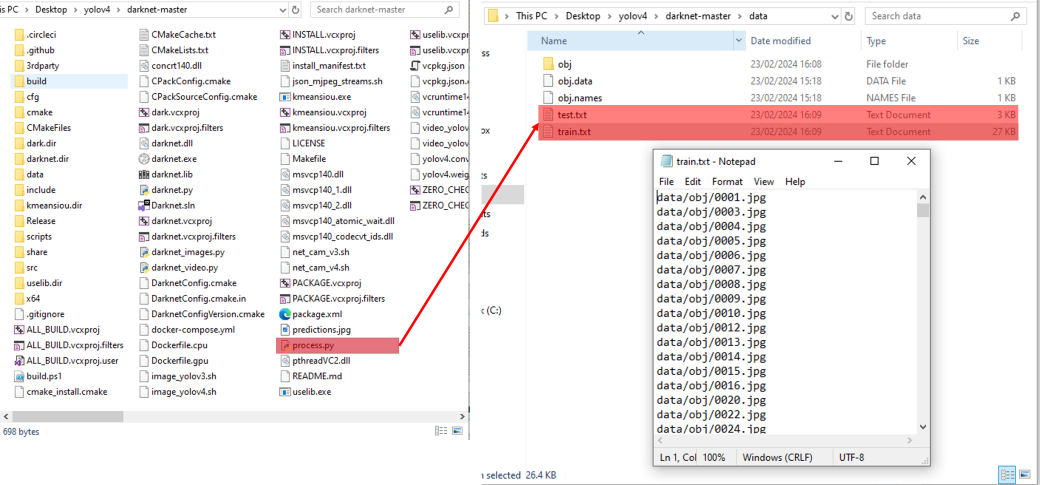
The process.py file is used to create the train.txt and test.txt files. It is designed to work with .jpg images and for the dataset to be located in data/obj. If you want to change the path of the dataset or if your images are not in .jpg format, you will need to modify this file.
Finally, the yolov4-custom.cfg file contains the model architecture and training parameters.
Modify “yolov4-custom.cfg” File
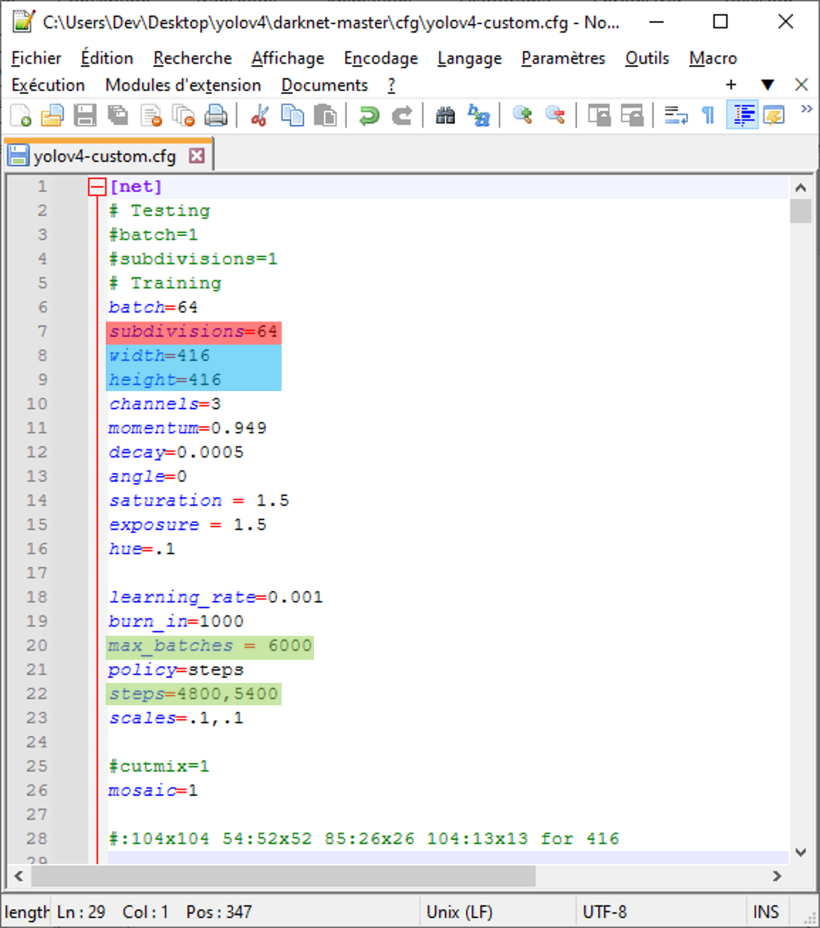
– At each training iteration, we take a “batch” of images, in this case 64, and we separate these 64 images into mini batch/subdivisions, in this case 64, which means that we send the images 1 by 1 because (batch/subdivisions = 64/64 = 1).
The smaller the number of subdivisions, the faster the training, but the greater the memory requirements of a GPU.
– Choose the input size of your model, here we’re at 416×416, if you want to change you need to keep a value that’s a multiple of 32.
– The “max_batches” number corresponds to the number of batches run during training, which can be considered as the number of iterations.
It is advisable to set a value of 2000*nb_classes with a minimum of 6000. So 6000 up to 3 classes and 2000*nb_classes above that.
– The “steps” value corresponds to the batches for which the learning is modified according to the “scales” values. Here from batch 4800 we multiply the learning rate by 0.1 and we multiply it again by 0.1 at batch 5400.
It is recommended to set equalised values at 80% and 90% of the number of “max_batches”.
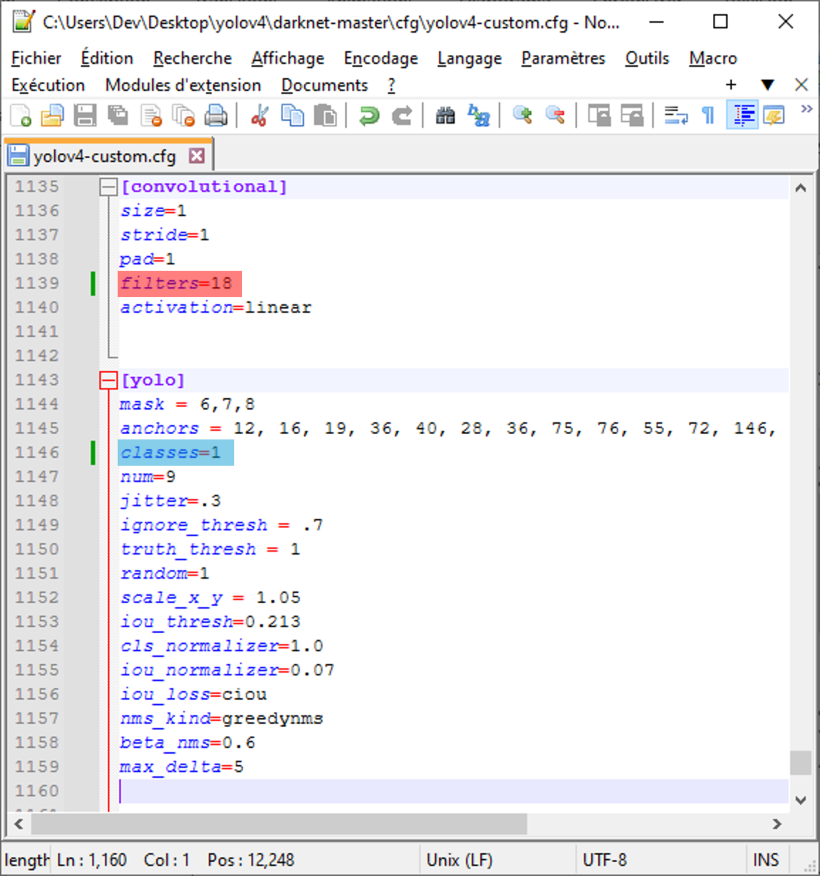
– The “filters” value of the convolutions just before each yolo layers must be modified according to the number of classes on which you want to train the model.
The calculation is simple filters = (classes + 5)*3.
– The “classes” value simply needs to be modified according to your number of classes.
Modify “obj.data” and “obj.names” Files
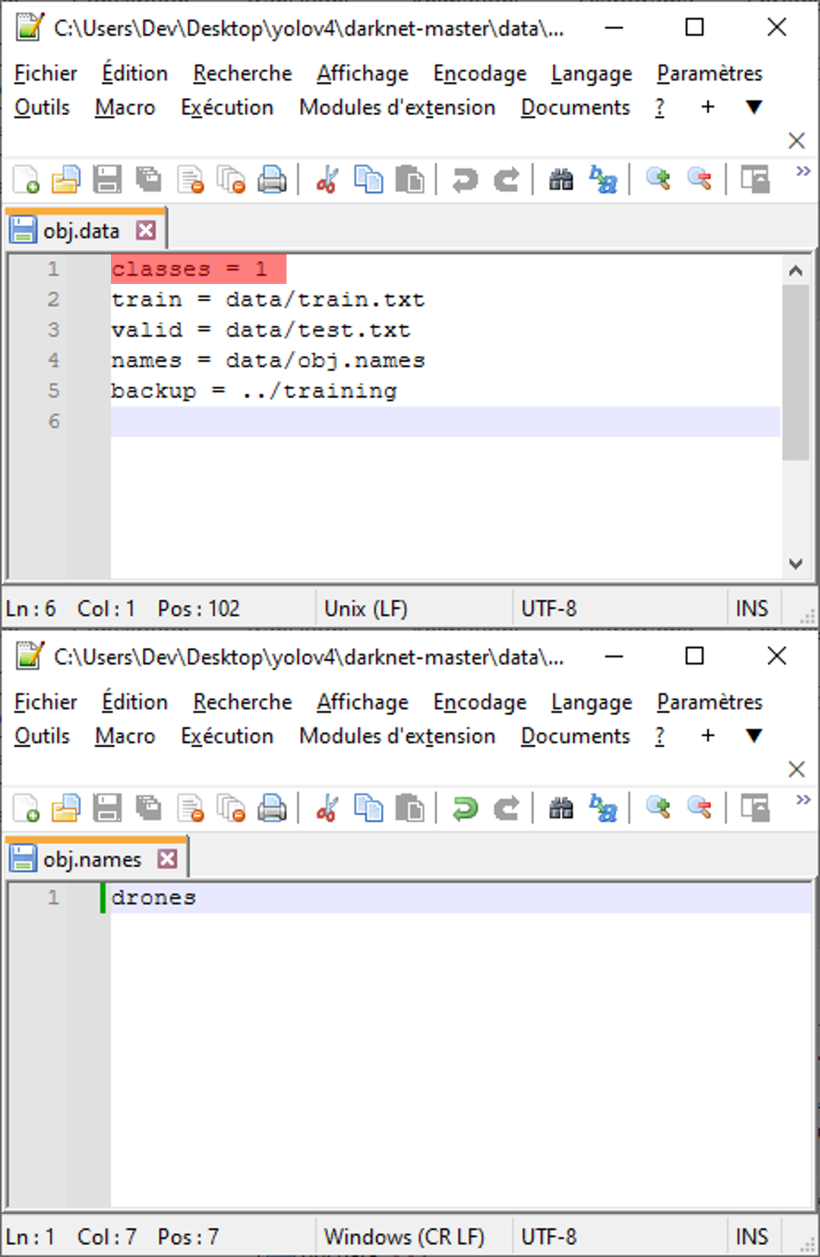
There’s not much to change for these files.
For the obj.data file, you need to change the number of classes.
For the obj.names file, you need to write the name of each class with a carriage return between each one.
Modify “process.py” File
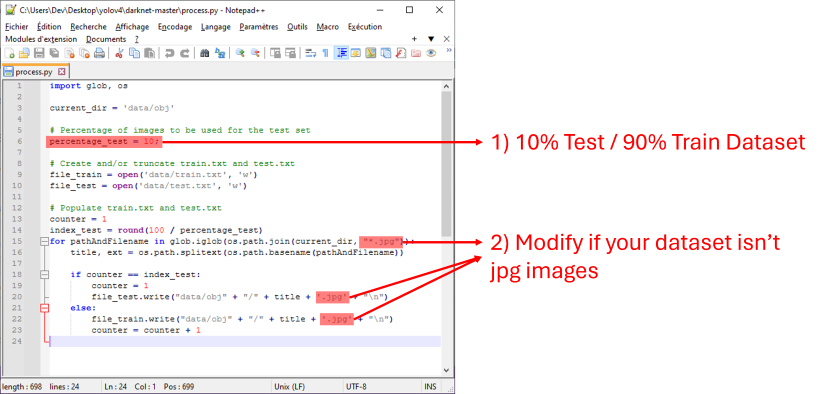
- The “percentage_test” value is used to define the percentage of images used for the test, the rest being used for training.
- Subsequently, if your images in your dataset are not in “.jpg” format, you’ll need to modify lines 15/20/22 to replace them with your image format.
Run “process.py”
Finally, you need to run the process.py code that you normally paste into the darknet-master folder.
To do this, simply double-click on it in the file explorer.
After running it, you should find text files in your data directory called “train.txt” and “test.txt”. These files should contain a certain number of lines corresponding to the names of the images.
Launch Training
And that’s it, you’re ready to train your model.
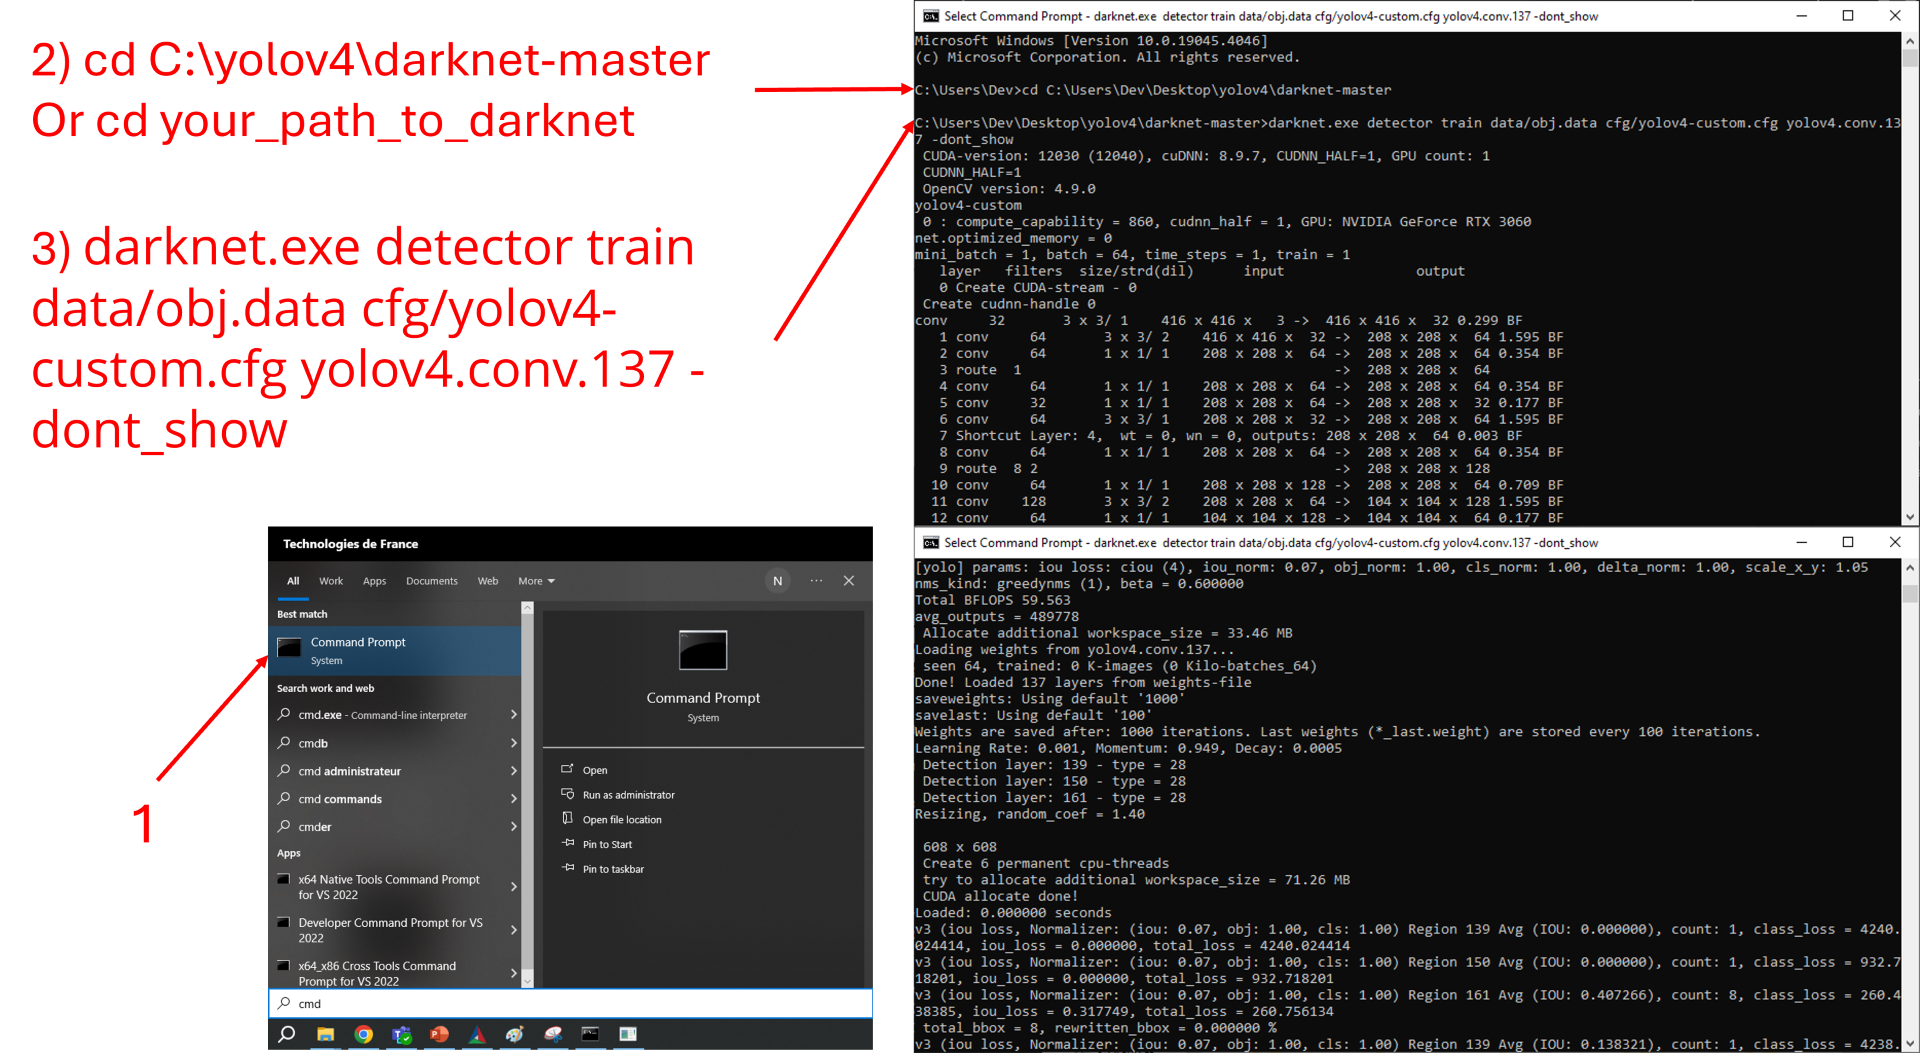
As for the darknet test, open a command prompt and place yourself in your yolov4/darknet-master directory, then run this command line:
darknet.exe detector train data/obj.data cfg/yolov4-custom.cfg yolov4.conv.137 -dont_show -map
According to this post, if you have set subdivisions with a value other than 64 you will have to disable the map calculation during training (you will be able to calculate it on the weights saved every 1000 iterations after training), use :
darknet.exe detector train data/obj.data cfg/yolov4-custom.cfg yolov4.conv.137 -dont_show
Restart Training (from the last saved weight)
If training has been stopped, either by you or by an external parameter, you can decide to resume training at the last recorded save (if you don’t change the parameters, this save is made every 100 iterations) by executing this command :
darknet.exe detector train data/obj.data cfg/yolov4-custom.cfg ../training/yolov4-custom_last.weights -dont_show
If your training is stopped before the end but you want to resume it, it is possible, you just need to run this command (it allows you to restart the training at the last save point, normally this recording is done every 100 iterations) :
darknet.exe detector train data/obj.data cfg/yolov4-custom.cfg ../training/yolov4-custom_last.weights -dont_show
Check Performance
I told you earlier that if you want to train your model more quickly with subdivisions below 64, you won’t be able to calculate the map during training.
Execute the following command line, modifying xxxx by the iteration (1000,2000,3000,etc…) in order to calculate this map on the different backups of your model (every 1000 iterations) :
darknet.exe detector map data/obj.data cfg/yolov4-custom.cfg ../training/yolov4-custom_xxxx.weights -points 0
- Visit our support page .
- Contact our technical support team at support@graiphic.io.
LabVIEW compatibility versions
LabVIEW64 2020SP1, LabVIEW64 2024Q1 are supported with this release.
Version of CUDA API
CUDA 12.3 & Cudnn 8.9.7
Version of OpenCV
OpenCV 4.9
Version of Visual Studio
VisualStudio 2022 17.9.0
Version of Python
Python 3.11.8


